I have seen the term "mock-up", and the process description, in many challenge posts. This year, and the one past. I used that as inspiration to make my first sort-of-wearable item in 17 years, and to stop being scared. So my challenge was to make a chemise mock-up. (aka- actually sew something, for goodness sake!) I've never tried a mockup before, the concept oddly hadn't occurred to me.
I want to express my thanks to Dreamstress for organizing this, and for the challengers who keep posting things that inspire. I was nervous about trying to fix my sewing machines, scared to cut my fabric to this older ill person size, blah blah blah. Both the deadlines, and the massive amount of created items posted, turned the tide for me. 17 year gap of nothing sewn, nothing even cut out, sorted! Thank you, all of you. :)
I want to express my thanks to Dreamstress for organizing this, and for the challengers who keep posting things that inspire. I was nervous about trying to fix my sewing machines, scared to cut my fabric to this older ill person size, blah blah blah. Both the deadlines, and the massive amount of created items posted, turned the tide for me. 17 year gap of nothing sewn, nothing even cut out, sorted! Thank you, all of you. :)
Ok, I don't want to post this one, actually. Didn't really think about what this would look like, with the fabric and such... so I'm embarrassed. However, as the first thing I've cut out, and sewn in 17 years... anything is better than nothing. So long as I don't just stop here. ;)
Anyway, in the hopes of passing on an inspiration to a person who has delayed sewing because they are intimidated by good seamstresses... here's an example to make you feel better!
Anyway, in the hopes of passing on an inspiration to a person who has delayed sewing because they are intimidated by good seamstresses... here's an example to make you feel better!
It's still too long, and I haven't done a final hemming, but I'm considering a small hem for winter wear.
The Challenge: #19: HSF Inspiration - Wed 15 October. 2014
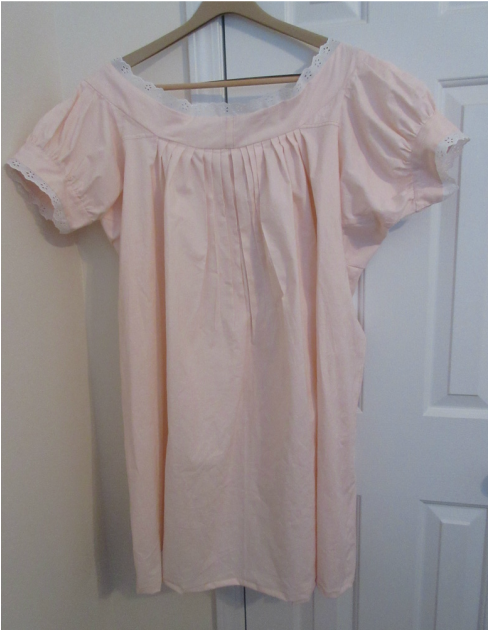
What is it?: Mockup puff sleeved chemise. Honestly, it's really a good thing I did not cut into my good fabric first, the way I always have done, years before. So much needed/still needs altering. I was also shocked at the 'new' sizing. Needed to recall how to use the machines, match pattern sections, sew relatively straight-ish, find my thread puller, and so on. This thing came so close to just being hand stitched, out of sheer frustration.
Fabric: Mail-order last year (sale), 3 of 5 yds, 100% cotton 'premium' broadcloth, 41". Was curious about types of cotton I've read about on the internet, other than what is available locally. It's a bit thick, but not as bad as the Kona cotton I also ordered. I'm accustomed to a thin, airy, soft cotton broadcloth. So, it's more a winter wear item (deep south USA). I intend to make my others from huge piles of lightweight linen cuts, in my fabric storage, which will be much cooler.
Pattern: Simplicity 9769, chemise. (Yeah, it's everywhere, apparently.) Pattern was chosen for the cost, $.99, and it looks similar to some linen extant chemises from 1830-60.
Year: Pattern claims American Civil War (1861-65). My guess is that mostly applies to older women, in styles from their youth, and those who like the style of the previous generation. (Or, chemise styles are not really subject to ultra current fashion, because the styles show up out of set years, so irrelevant to some extent.) Going with style year is 1830-45, but sewn in mid-1860's.
Notions: 100% Gutermann cotton greyish thread, sewn on a machine, mostly. (This thread needed to be used up, I'm saving the better thread.) Treadle machine, after the belt was fixed. Some on the electric machine, that I fight with. Usual hand sewn parts with Aurifil cotton 50/2, 2021 (hem, gathers, facings, fiddly bits). I will learn how to use the various machine feet, just not right now... I don't have any info on the lace, other than it's cotton.
Not sure about adding lace to the chemise, probably won't with the real ones. I like cotton lace, and that sure would be easier than whitework. However, doesn't seem like lace was done too often. Possibly because even though made of cotton thread, the lace still wasn't sturdy? I threw some cotton eyelet (aka machined cutwork) on this one, just because it was already turning out hysterically cutesy from the pink, and those sleeves.
How historically accurate is it?: I can't imagine the fabric is accurate at all, it's pink! Almost certainly would have picked it apart for the next person/size change, or used as a flat liner elsewhere. It's at least cotton, so the fiber requires less justification than the linen I'm going to use. The eyelet lace is not correct, unless there was a middle class machine made version of cutwork, which I can't find info on. The well off, or the idle, had something close-ish to this style lacework done directly on the item, far as I have seen. I can't seem to find out if the imitation/machine lace started in the early 1800's included cutwork, or not.
I'm 40 yrs old. So, in 1862-65, using a machine, with mis-match thread, and sewing an out-of-fashion style, sounds reasonable to me. (Mis-match thread could have been a method to save good thread, because a blockade was causing re-stocking shortages?) The sewing machine would have been much easier back then, for me to use, because of how my family operates. (In 1860, chances are I'd still be living around, and with, my family.) At it's brand new state, the inner workings would have been detail sketched and documented.
Those machine needles would be sharp, and stay sharp, sorry to all the needle sellers who possibly got excited over sewing machines. ;) I'm not as good at sharpening them, myself, but I do better than most, apparently. From what I read, the done thing, now, is to just go buy new needles for each 'project'. Wow.
Sure, we would have a large collection, in case of occasional breakage, but that's it. The machine would have freed us from buying needles so often. Most machine needle backup packs are decades old, and still in their packaging, whereas our hand needles, in normal sizes, are few and far between. Both the packs back home, and the ones I was sent out with. If one machine needle seemed to need a touchup, you swapped it out with a backup, until you were able to attend to the first. This usually only required two needles, max.
The whole machine would be maintained better than the factory would have dreamed of. Only downside would be smiling and nodding through all the hot air, about how they could have built it better. (Well, ya didn't do it though, did you?) To economize, I might have tried to reserve all my hand sewing for winter, so I wouldn't burn through the sides of hand needles. (I forgot that's what I did before, for the same reason.) Many women don't do that to hand held needles though, I think.
However, I did use the electric machine (not introduced until about 1890), until the belt was fixed on the treadle. Plus, it's not a hand crank anyway. So, maybe 20% accurate? Probably less. If I do learn how to use the assorted attachments/feet, I'd like more research on invention years for home machines. I can only find that singer patented the ruffler, tucker and binder in 1856. But not if those attachments were available for the house sewing machine owning groups/families.
Hours to complete: 5 hrs+. Mostly time taken up with washing the fabric, fitting and tracing/modifying pattern parts. Actual cutting/sewing went super fast. Being as this is a mockup, should be faster when I make my real ones. Uh, not counting hand stitching time. Forgot, and no idea how long that was.
2 Agent's of Shield episodes, 1 Outlander, 2 Bones, 4 Dr. Who, and some awful movie my housemate wanted me to see. Not able to stitch the whole time. One cat repeatedly got frustrated (just about every evening), and wanted cuddles right NOW. The cats seem to think if I sit down it's their time. I did wear through 3 needles, and now my sewing fingers hurt all the time, because of the metal. (Nickel) I need to find a good supply of stainless steel sewing needles. Or sew in the winter, wearing finger guards. In the winter I can wear finger guards, or thin gloves. To protect the needle from me, and me from it.
First worn: Might use for sleeping, when it cools off at night, later this year. Will possibly be worn for fitting a corset over, depending on how fast I get around to making a real chemise. I can already tell I need to wear it some, to get an better idea of exactly how I want my real chemises.
Total cost: About $16.60 USD, full price, including thread, if bought today. (You would need to buy all items online, if you lived here.) Excluding lace. Then divide, by any sale, for cost.
Not sure what the lace/swiss embroidery would cost now. I haven't seen any of it in cotton, locally. These scraps of lace were bought when I was about 13. (Everything was stuff I already had, except the pattern.)
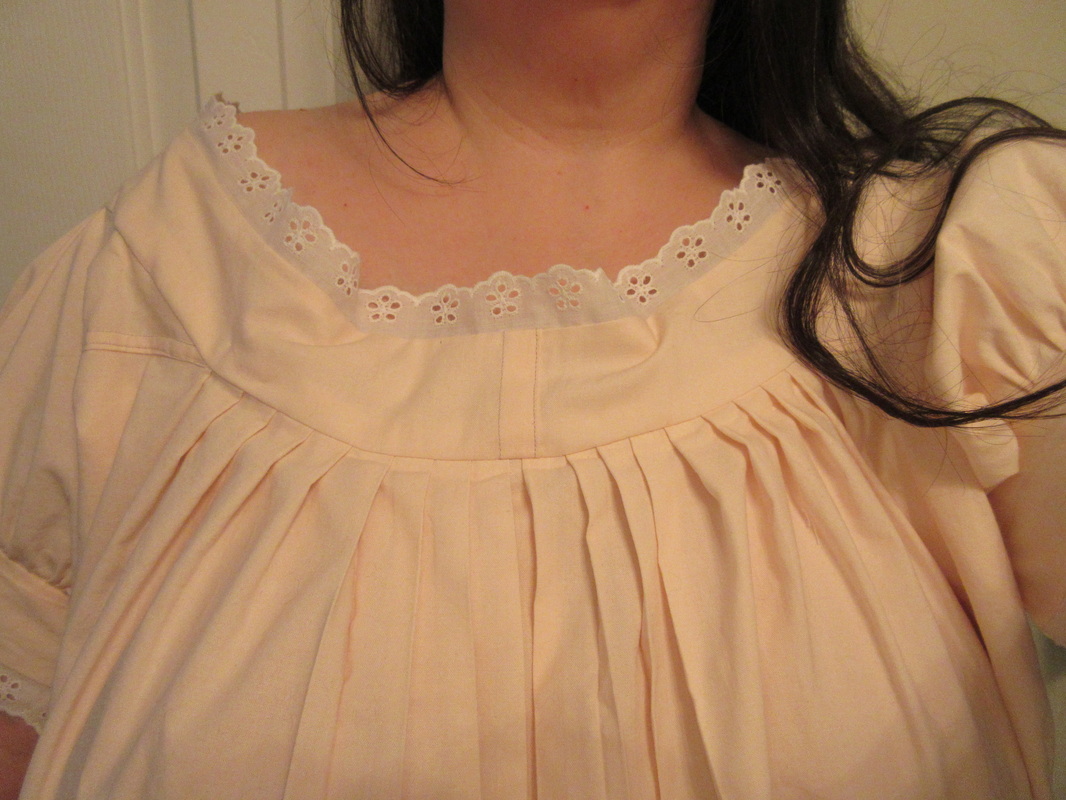
The yoke seems too big still, which is probably not helped by proportions. That's a very wide yoke meant to just sit at the shoulder caps. I'd never tried pleats before, but I think I may look into learning how to do those.
Sorry about the grain bag, and pail, in background. This thing was so hot, I couldn't bear wearing it more than a few minutes. I was snapping pics fast. Anyhow, my 'bustle'! lol
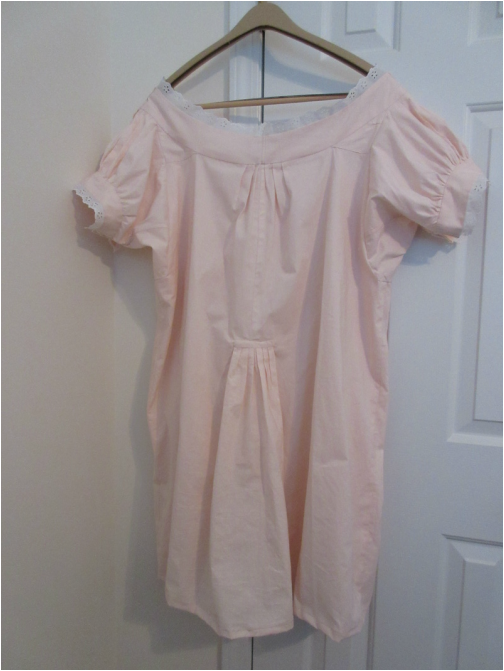
Ha, you can see where the 'bustle' that sits at tailbone is, vs the arm gussets. Goodness. I cut the back to tailbone, then slashed out 5" both ways. Cut the middle out. Seamed up the back, and sort of 'pleated' the bottom stuff. That ate up a good bit of fabric.
Something else related to the above pink confection. I'm apparently to be supervised when sewing now, by this normally sweet lady....
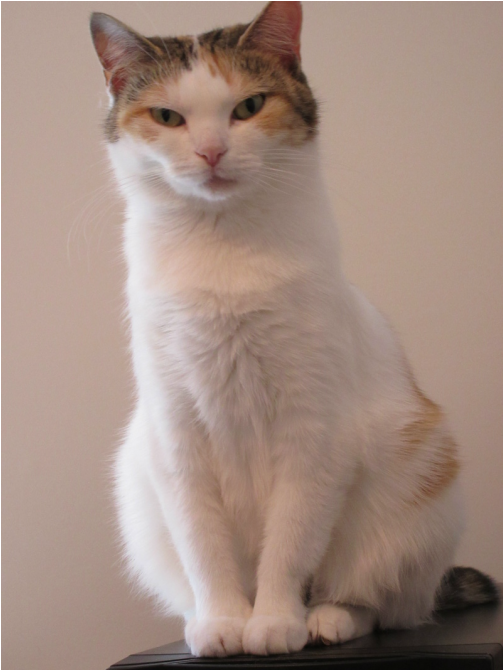
Look at that face. Not going to forget anytime soon...
Having not sewn in so many years, you'd think I'd cut myself some slack, but no. I made the mistake of getting quite aggravated with the thing (actually myself), and threw it across the room. Just as my lady Rose was strolling across from the other direction...
Oh, the face I got, as she slowly turned... looked back at me in horrified shock... with chemise bits sliding off her back... Gulp. A human tantrum, in her house? Nip that in the bud, right now.
So now she watches me. If I so much as pull a low growl, those eyes narrow, and the tail starts a warning tap.
Yes ma'am. No throwing things. No yelling. I can behave...ahem.
Pattern Review: Simplicity 9769, chemise
Had to laugh. Back when I made most of my clothes, my pattern size was 3 #s LARGER than the store bought size I needed. What a reverse now. The yoke was ten (10!) sizes SMALLER than what the pattern said I should cut, after fitting. Smaller than my store bought size # by at least 4-6, depending on manufacturer.
The sleeves were 8 sizes smaller. Misjudged, and whacked off to 10 sizes smaller. Which could be bad news, if the sleeve was going to hit on the bicep. It didn't, so, probably 10, but I am going to cut the next one to 8 smaller, and go from there; because the sleeve is also too long. It was the armband that I was concerned about. But the sleeve gusset is at my lower ribs. A tad off. ;)
I was puzzled at the sheer size of the yoke parts, and thankfully pinned it on first. Needless to say most pieces, from then on, got checked out first. Went looking online, and yes, apparently that's common now with the Big 4 patterns. How funny. What's not funny is without a mockup, or some alternate pre-testing, this pattern would have wasted good fabric. Folks, a smaller size 'number' doesn't change the human body. It only causes a mess in knowing which size to buy, sew, or order.
Due to the idea of historical construction and super rusty skills, I attempted to actually read instructions first. Well, it's commercial, so I didn't find much. The way they have you attaching bordering lace, *stitched bare, on the side of the garment facing skin, seems crazy. I have always assumed you were meant to sandwich trim in the seam. Adding a buffering of protection for the seam, and trim. I think the pattern also had you cut out the cuffs as a single piece. I didn't do that, for fabric space, nor would I recommend doing that.
I didn't use the side piece, instead I just cut main back and front sections from selvage to selvage. Works out to still less width than the pattern pieces, plus the side panels. This was for fabric constraints, and I intended to cut out two gores that would start at my hip bone. I never did, because there was plenty of room for my hips to bend, squat, whatever, with no problem. My hips are less than the usual size of a women with my other measurements. So unless you've worn slim fit jeans as regular relaxed fit, you might want gores, or the side panels. The body itself is still 10 inches too wide on me, and doesn't fall in a nice period looking looseness. It's just flipping huge.
Back fabric... Wow there is a bunch of fabric in the back. I used a fix method similar(?) to what is described in Godey's Lady Book Jan-Jun 1859. But, I was having trouble understanding the 'words to visuals' thing, so went searching. I found a visual, and what seems a better explanation, from Elizabeth Clark's free chemise offering. It did exactly what I wanted, but I don't think either source meant it to look like mine turned out. I have something of a 'bustle' chemise! ;)
If you are one of those who tries to follow pattern instructions, please check ahead, because one of their steps was pretty much backwards. I don't know how common that is. This might be the very first set of pattern instructions I've attempted to read.
I'm probably going to be cutting out my next pattern (same company), based on working measurements of this one, 8-10 sizes smaller than 'my measurement size'. Frankly that's insane. I keep getting the urge to go measure my old patterns (the wide range versions, that would have the bigger sizes) at that size #, just to see how many inches they have added. To what they claim is standard sizing that 'didn't change'. Yes, yes, it did change.
*From what I've read, yes you would stitch it this way, so you could remove it easily for washing. I still haven't found how they would have protected lace, on underwear, from the skin oils. I still think sandwiching them in the seam helps hold the lace away from the skin, but not sure what they actually did.
Fabric Review: 100% cotton 'premium' broadcloth
Not impressed with the broadcloth yet. It's rather thick, and therefore too hot for most of the year. It is however, soft and definitely not stiff. Kona cotton broadcloth, which is the one online sewers seem to like, is worse. We will see how it wears, over about eight years. It might thin out sufficiently.
I bought some Kona too, and now I'm at a lose of what to do with such thick non-summery fabric. I bought them because I kept reading about how stiff/cheap broadcloth and quilters cottons/calicos are. I was very puzzled, because the only stuff I've seen like that have been seasonal, or novelty prints.
Still have no idea what they are talking about. Quilting cotton is not, nor has it ever been, cheap anywhere I've lived. Usually $9-10 yd, which isn't what I'd call cheap fabric. Sales may take it down by 30%, but not usually more than that. I've also not seen 100% cotton muslin for a dollar a yard, no matter what kind of sale. Muslin is usually about half that of quilters cotton, and more with wider widths. I think I'll just stick with the old regular cotton broadcloth. It's thin, easy to use, easy to wear, soft after washing, and the lowest in cost of all normal cotton fabrics I've seen.
Will be using the remainder of the length for a mockup of the drawers from the same pattern set. (Possibly not, might skip those, and try Kay's instead.) Once that's done, it will be 5 yards cotton... off the storage list!
References:
Lace-
The Lace Guild
Project Gutenberg's Lace, It's Origin and History
Lace Classification System by Rosemary Shepherd
Identifying Handmade and Machine Lace
It seems as though lengths of the cutwork type 'lace' could have been reproduced on a Pusher machine (around 1839). Maybe the Hand-Embroidery machine (1828 created, so 1830's), and definitely possible on the Schiffli machine (possibly available after the war, invented in 1865). Machine made lace was much nicer than it is today, with the exception possibly of a specialty maker, like clunylace.com. (I have not yet figured out how to get an idea of their prices, without calling.)
No clear reference indicated if it was actually done, nor if it was sold in American stores. This type of 'lace', and especially any sort made by machine, was not regarded as real lace by assorted fashion folk, social women who kept journals, and article writers. A high class impression, by all accounts, wouldn't wear ANY visible machine made lace. Probably even on the unmentionables, due to servants/laundresses. This stance was very supportive of the low income handcraft lace makers, whose livelihood was severely shaken, but I can't tell if they derived much benefit.
Delicate lace couldn't be used like piping, or cutwork, to buffer a seam edge from wear. In fact, it needed to be taken off the garment and washed separately. Carefully. While making this chemise, and looking into lace, I've discovered a love of lace that I wouldn't have known, with the polyester lace. However, I think I'll stick to only lace that can handle what I'm going to dish out to the whole garment.
How I would have felt about it as an 1860's women, I'm not certain. Even if I understood the handmade workers point of view, I still might feel no guilt or shame buying the machine lace. Provided the more social/city/town women paid premiums for real lace, and bought enough of the stuff. Mostly because if I was going to justify owning something so frivolous, it couldn't ever cost the purchase price of real lace. So, it would be machine lace, or no lace.
Chemise-
Godey's Lady Book Archive Jun 1859, page 548
The Sewing Academy - Compendium
What I'd love is a museum dedicated to all the falling apart from WEAR clothing, in various decades. Pristine clothing is only interesting in an art form way. I want to see more of the 'I really liked, needed this item, so wore it until it was almost unusable...'. Problem is, that would still be mostly rich folk, which I quite think are already over represented in museums, as it is. Frustrating. All those practical people in the past not leaving me things to examine! Haha.
I have other museum reference pictures, in this style, but 1860's. However, the copyright reads to me as if I'm not allowed to share them, at the resolution I have; and the wording seems to indicate they'd rather you did no sharing, unless you are a professional. Plus, back when I downloaded them it was only for my reference, so I really have bare information, mostly descriptive, with date. I am still grateful those museums decided to publish some of their collections online. That is a a lot of work, and effort on their part, and it has helped me immensely.
Below are photo images from the Metropolitan Museum of Art, and I'm forming my style date opinion from this museum's collection, and approx. three other museums. That opinion could be quite inaccurate with what really was.
(I didn't know I'd be sharing pictures back when I downloaded them. There is limited space in a file name, so I previously didn't include accession numbers, nor usually credits, even when there was room. Will try to update with museum number, and better resolution, as I re-find them.)
May I say that if you chose a museum to patronize, I was extremely pleased to recently read the Met's policy on sharing of artwork, including items not on view at the museum, but part of their collections. Such as the mostly incorrectly referenced work below (were it referenced correctly), and I believe they should be rewarded with funding.
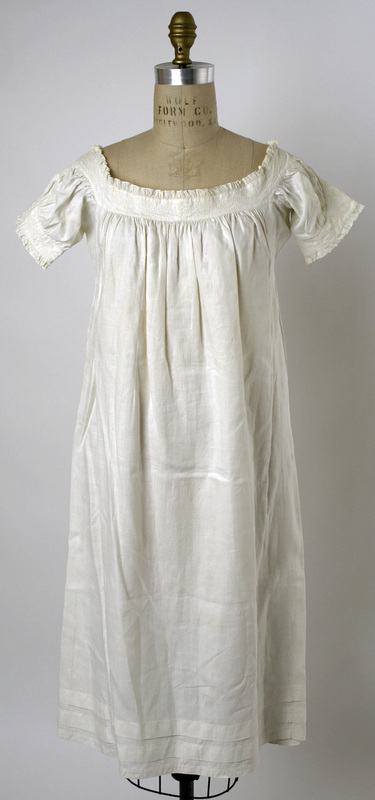
1830s,American or European,linen,Gift of Mrs. E. V. Anderson, 1943,Accession Number- C.I.43.126.50.www.metmuseum.org
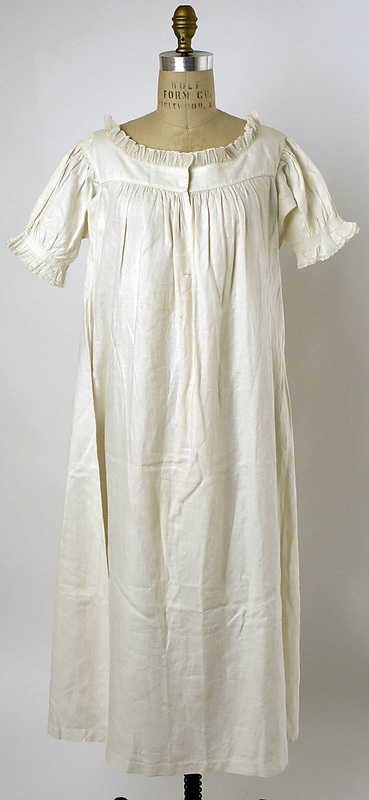
1830,American,Linen,CB 45in,Gift of The NY Historical Society, 1979,AccNum-1979.346.244.www.metmuseum.org
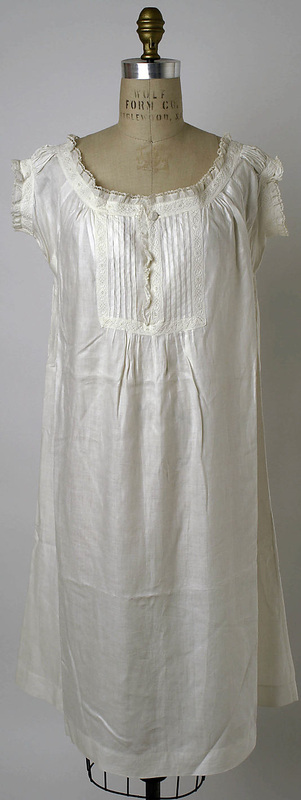
1860s, American, Linen Chemise at the Metropolitan Museum of Art. www.metmuseum.org (Included because of the applied lace types.) Wish there was pictures of how the lace was secured. Although, the flat lace says to me this was easy care lace, or that this was a chemise worn maybe once per lifetime. Which makes sense with the lack of any visible stain 'ghosting'.
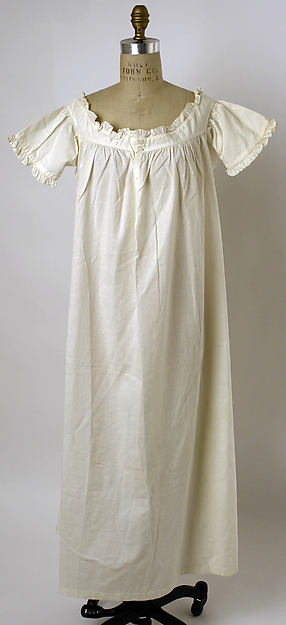
1830, American, Linen Chemise at the Metropolitan Museum of Art. www.metmuseum.org
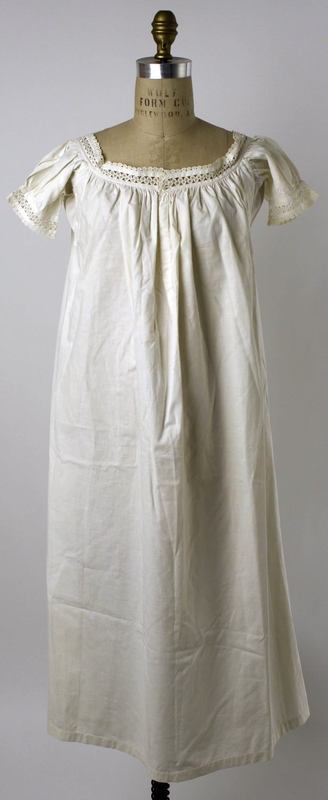
1860–65,American or European,with lace,Gift of Mrs. Edward E. Harkavy, 1944,C.I.44.48.12a, b.www.metmuseum.org
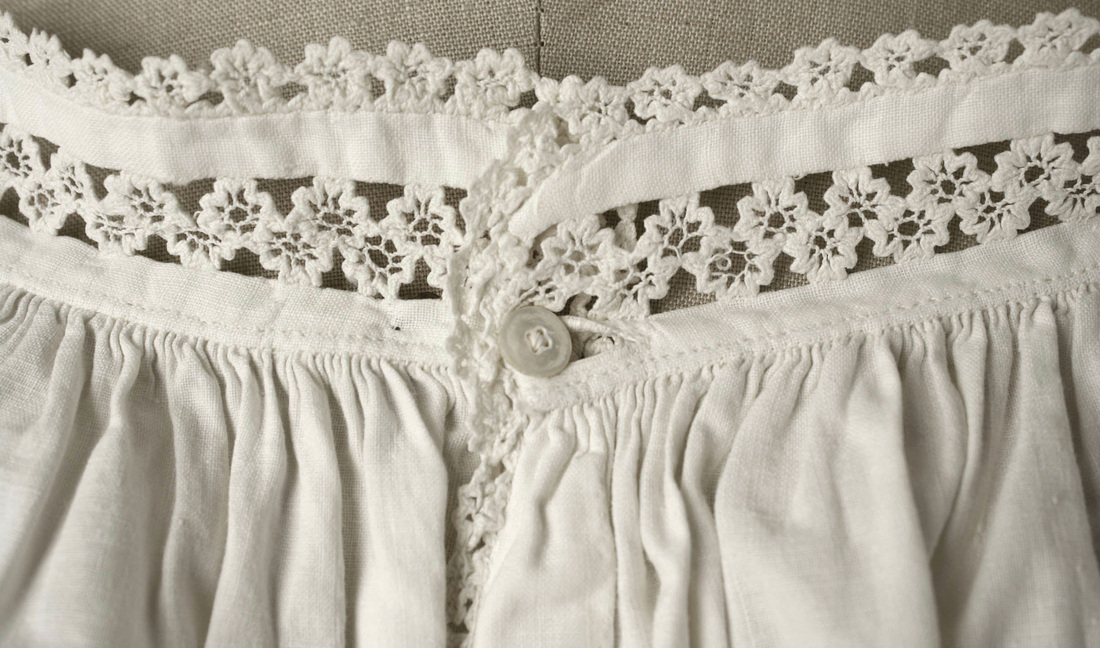
1860–65,American or European,trimmed with lace,detail,Gift of Mrs. Edward E. Harkavy, 1944,C.I.44.48.12a, b.www.metmuseum.org. I bet that lace was unrecognizable, after a wash, until the starching and ironing. It's so beautiful! The yoke here is similar to another chemise pattern I will be trying out.
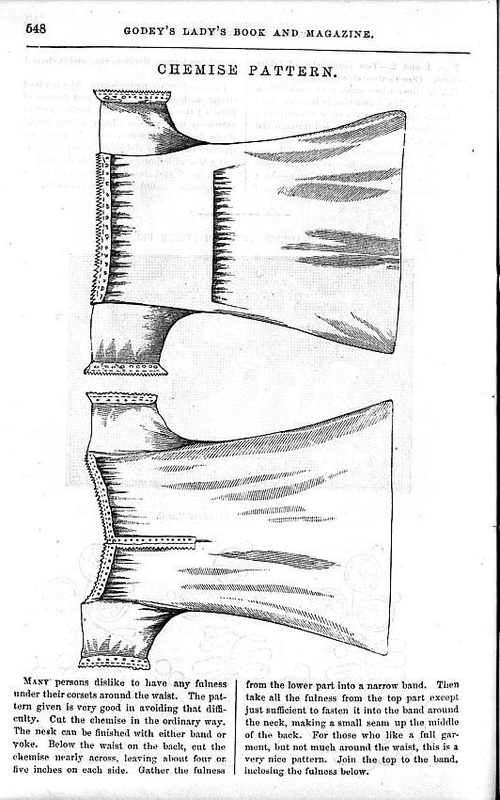
Scanned book image, with text, is in the linked reference, but posting it here in case the link breaks.
 RSS Feed